
The Green Wrapper's video shows how to sew the form here.
In this 1st video, I've documented making the initial parts of a second Pin Cushion I made over the Winter of 2024. It was done after joining Zen Stitching a Sashiko Stitching Membership, and after going through a few other random courses and reading more than my fair share of books diving deeper into hand-sewing and plant-based fabric dyeing. I wanted to understand how to get the exact colour I wanted, one that matched the decoration on my tea pot (below) and how to do these basic stitches known as Hetomezashi.

My 1st video takes you through the stitches.
VIDEOS Mentioned in my 1st Video:
1. The List + Drawing Squash Blossoms, Echinacea and Bee Balm Leaves here.
2. Yoga for Complete Beginners here.
I have put together a couple of kits to make prep work easier and less expensive if you would like to try this project and you can get right down to stitching.
Here's a link to another post with links about natural fibers and fabric frequencies I found fascinating in case you're wondering about material choices I make for the shop. If any of you have tried some of the light-weight merino t-shirts or slacks, I'm very interested to know what you think because I'm slowly building a capsule wardrobe and am ready to invest in some higher quality pieces but it's a bit hit or miss because I'm relying on online shopping.
AND
Part 2a documents starting to sew the four pieces of fabric together.
Part 2b will complete the hand-sewn square form leaving the last section open so I can fill it.
Part 3 will show the ball being filled and document finishing details. I'll also provide my final thoughts on this project and talk about where it's led me.
---My first foray into sashiko stitching started innocently enough with an Introduction to Japanese Sashiko Stitching, the Domestika course taught by Atsushi Futatsuya.
Here is an interview with Atsushi by Selvedge Magazine, a textile arts magazine, I would recommend if you are interested in fibre aesthetics and sustainability.
Two books I now own and would recommend if you are interested in learning more about Sashiko stitching are:
1. Simply Sashiko, Classic Japanese Embroidery Made Easy by Nihon Vogue
2. Sashiko 365 Stitch a new sashiko pattern every day of the year by Susan Briscoe
I decided to try this Sashiko Stitched Pin Cushion project by The Green Wrapper because it allowed me to tackle something on brand for my shop (multi-functional accessories that are small and practical). The Otedama form can be used to play a non-competative children's juggling game, or it can be used to make an exercise ball (I will show how to make this in a later video post) or, it can be made into a pin cushion. Once I finish this post, I will provide other ideas I am thinking of using this for, too. I fill my pin cushion with a different filler than The Green Wrapper uses. I use crushed walnut shells because it helps keep the needles and pins sharp! Sand could also be used. I was a little heavy-handed, using both the sashiko threads and a heavier cotton embroidery canvas AND in how many plant-based materials used (chamomile tea, oranges, turmeric and black tea) to get the colour I wanted.
I later found The Green Wrapper's video showing fabric dyeing using only onion skins to get a very similar colour to what took me well over a day to come up with through trial and error ... then I discovered TGW gardens, too! YAhOOOoooOO! Slightly sad to see, though, their fabric dyeing video was created because of a gardening injury.
The Green Wrapper refers to themselves as a beginner BUT they have so many wonderful video lessons showing a solid proficiency for several projects already on my growing list. This had me breathing a sigh of relief knowing I don't have to reinvent the wheel as I keep trying some of the new hand-stitched projects I want to try. Honestly, I know I won't follow all their instructions. If you want a tutorial for that, please follow their video (above) for straight-forward details and watch mine for the problem-solving and creative process aspects of slow stitching.
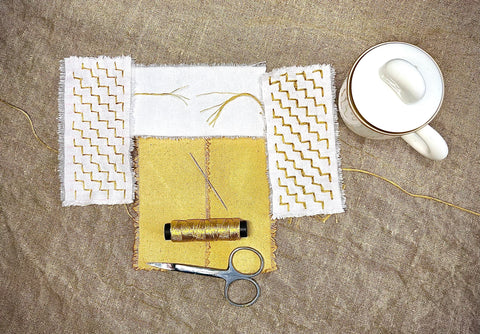
The number of sashiko threads I used differ on the two hand-sewn sections. I used 6 threads on the first piece and 3 threads in the second. You will notice how difficult it was pulling the six through the heavy embroidery canvas using 6 threads, but I would do it again because I really love the textural differences between these two stitches known as Linked Step or Dan Tsunagi.
On the second white piece of canvas, where I used 3 threads, the stitching was a lot easier. I could have left it there but I wanted to try another stitch that is built off the back of Dan Tsunagi and did so by adding a fleck of metallic embellishment to create Hawks Feather also known as Takenhanezashi, in a nod to the rarely used family Japanese tea set I inherited when Mom died that Dad bought for her while overseas (as seen in a photo above).
I will write Part 2b blog post soon and include a flat lay photo showing a visual of what is in the Pin Cushion Kit:
Here is a list of what the Kit contains [6 pieces of 2"x4" white embroidery canvas and 2 pieces of 2"x4" bright yellow embroidery canvas, yellow sashiko thread, metallic gold thread, a sashiko needle, 2 square yellow buttons and 2 triangular green triangle buttons and enough crushed walnut shells to make 2 pin cushions.]
If you would like to purchase it, you can e-mail brenda@oneseedwonders.ca
I will eventually add it to the shop.
Again, Part 2b will all but complete the pin cushion form and Part 3 will detail filling the pin cushion along with a pertinent & maybe impertinent story along with a few thoughts on what's next.